Ad Here

Wednesday, August 14, 2013

Change your keyboard buttons as your sweet-well

We all have to type often in pc, laptops, notebooks etc . Sometimes some buttons may not work or the have been broken . For that we have to buy new keyboards . But when using a notebook or laptops it is not easy to replace a new keyboard . We can easily avoid this problem if we can apply some tricks . We do not use all the keyboard buttons usually . We can replace our necessary buttons to those unnecessary buttons.


For that we need a software . Don't worry it's only 500kb soft. Download it from here : http://www.randyrants.com/sharpkeys3.msi Now install it and open it .You will find a interface like this :

  
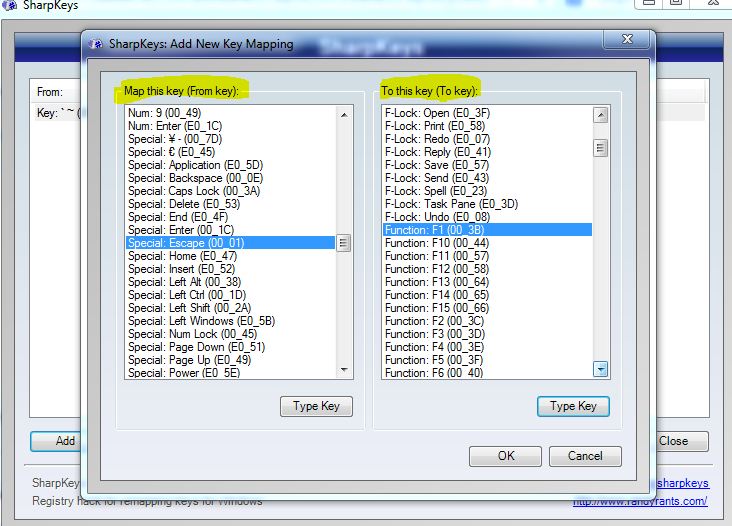
Ok now we have to select the key which have to be replace . For that we need to click the add button . For example if we want to replace the Escape button to F1 now have to to select Escape from "Map this key" option and F1 from "to this key " option . Now click ok . For more details see the picture at below :


Now click on "write to registry and click ok . Now restart your pc and see magic . If you press F1 it will work as Escape . For resetting your keys delete all the changes from sharpkey soft . That's it . Actually sharpkey is a keyboard mapping tool . It edits registry according to your wants and changes the behavior of the keys .

If you like this post than keep connected with www.webunbound.blogspot.com . Thanks for staying with us . We hope we will provide better articles in future time .

Sunday, May 26, 2013

DVD drive disappered in Windows 8 . Get it back now

I have recently installed Windows 8 . Before installing windows 8 I used windows 7 . Everything was alright with windows 7 . But after installing windows 8 I faced so many problems . On of the major problem is that my DVD drive was totally disappeared after reboot . Then I searched in Google why my DVD drive was disappeared . I saw in Google search results that many of windows 8 users are facing this problem . Then I searched it's solution on Google and fixed the problem . I think new windows 8 users will also face this problem . For that I am giving the solution how to get your DVD drive back .

 First open COMMEND PROMPT in administrator mode . For opening COMMAND PROMPT in administrator mode first click on the search from start menu . Then all your apps will be appeared . Find out the COMMAND PROMPT followed by the category Windows System . Click on the COMMAND PROMPT with right click of your mouse . Then some options will appear . There you will find a option named Run as administrator . Click on it . Then your COMMAND PROMPT will start as administrator . If you did everything as I said then we ready to go on next step .

Then copy the following code given below .

reg.exe add "HKLM\System\CurrentControlSet\Services\atapi\Controller0" /f /v EnumDevice1 /t REG_DWORD /d 0x00000001

Now paste it on COMMAND PROMPT and hit enter . If everything is OK then you should see a message like this .

Your operation is completed successfully .

If you have seen a message like this then close the close the COMMAND PROMPT and reboot your computer . That's it . Now see your DVD drive is back .

Thanks for reading this article . If you have liked this article then please comment . If you want more posts than be connected .

Saturday, May 25, 2013

Premium blogger templates for free

Blogger.com offers a free blog site to the bloggers . It is totally free . It is most used and popular for its features and facilities . It is a free service of Google .So it is a wonderful opportunity for new bloggers to start a blog with blogger  to earn money from online advertising sites . The most important part of a blog is it's look . The template must be user friendly and beautiful . If a visitor will found your blog ugly and difficult to use then he/she will leave your blog in a second and he will never come back to your blog . If their will be not enough visitor then your blog will not come to any use . So now I hope you can realize the importance of your blog's template . But it is hard to find a beautiful and user friendly template for you blog . In themeforest.net you will find a plenty of good looking templates . But the are costly . As we are using free services for our blog then we should get the template for free . For that reason I will give you 5 stunning, smashing, user friendly premium blogger templates for free . You can also see the preview of the template before download . So choose one and integrate it in your blog .


1) Capia


DEMO  |  DOWNLOAD

2) Hostia


DEMO  |  DOWNLOAD

3)VehicleInsurance  


DEMO  |  DOWNLOAD

4) Scrappy


DEMO  |  DOWNLOAD

5) Helix


DEMO  |  DOWNLOAD

These are premium blogger templates . You can download these templates for free .So download and enjoy . To have more templates be connected with www.webunbound.blogspot.com . If you liked this post then please comment . Your comments will encourage me to write more posts .

Thanks to everyone for reading this post .

Tuesday, May 21, 2013

Enable .NET 3.0 in Windows 8 ( Offline and Online )

Windows is the most popular and used operating system worldwide . Because it has a user-friendly graphical user interface . Windows was first introduced in 1995 . Science 1995 Microsoft has published so many versions of windows like windows98, windows XP, windows Vista, windows 7 and windows 8 . Windows 8 is the latest version of windows . But it has some problems . On of the major problem is that Windows 8 has been made with .NET framework 4.5 . But a lot of necessary software has been built based on .NET 3 and 3.5 framework . So these are not supported by Windows 8 . But you can still use .NET 3 in windows 8 . There are two methods . They are offline and online . I will show you both of them .


1) Enable .NET 3 in offline .

 For this operation we need a DVD of windows 8 .  Put the windows 8 DVD on the DVD drive . First open the CMD prompt  in administrator mode .Otherwise it will show access denied . For  opening the CMD prompt in administrator mode click on the search from the start menu . Then all the program will be shown there . You will see a program named "COMMAND PROMPT" . Do a right click of mouse on it . Then some options will be shown on the bottom . There you will find a option called "Run as Administrator". Click on it . That's it . You have successfully open the COMMAND PROMPT in administrator mode . Now copy the following code and paste it into the COMMAND PROMPT .

dism.exe /online /enable-feature /featurename:NetFx3 /All /Source:H:\sources\sxs /LimitAccess

Note that the Source:H:\sources must be according to your DVD drive letter . IF your DVD drive letter is F then the code should look like this

dism.exe /online /enable-feature /featurename:NetFx3 /All /Source:F:\sources\sxs /LimitAccess

Now paste it into the COMMAND PROMPT and hit enter . It will take a few minutes . It show you that it has been completed . Now reboot your PC and enjoy the .NET 3.

1) Enable .NET 3 in online .
For this  operation we do not need anything without internet connection . First go to

SETTINGS>CONTROL PANEL>PROGRAMS AND FEATURES >Turn windows features on or off .

Then you will find a box like this .


Click on the following box and click OK .

Then it will download the necessary files from the internet . After the completing the operation reboot your PC and enjoy . That's it .

Thanks for reading this article . If you liked this  article then please comment . Want more like this .Then be connected witt www.webunbound.blogspot.com .

Thanks.

Wednesday, May 15, 2013

Learn how to make gold text-effect in illustrator

Illustrator is a very useful tool for designers . We can easily design anything we want in illustrator . We can design logos, vouchers, banners, icons etc in illustrator . It is the most popular designing software for its user friendly interface . It is easy to use and saves a lot of time . Today I will teach you how to give gold text-effect in illustrator .


 I will use illustrator cs5 for this tutorial . OK ,lets see how to do it . 
You must be familiar with illustrator selection tool , type tool ,gradient tool  , eye drop tool .
At first open a new document in illustrator with a measurement of 280*280 . Then select the type-tool from the toolbar.


Now write "WEB UNBOUND" or any other text you like .
Now select the text with selection tool by click on the text. See the picture given below .


Now find and select OBJECT>Expand>Ok . See the picture .


Now selsect the rectangle tool and make 3 rectangle shapes . See the picture .

Now select the first rectangle tool and change it's color by clicking on the color plate and give the hexadesimal code F1D178 see below .


Than change the color of 2nd and 3rd rectangle as you cahnged the first one give the hexadecimal code 966D33 to the 2nd one and F2E081 to the third one . If you did everything as I described then you will see a picture like it.


Now it is the most challenging part .
Select the text(Web Unbound) with the selection tool . Now convert the color of the text from basic color to graindiat . See the given picture to do it easily .


Than select the first rectangle with selection tool . The color of the first rectangle will appear in the color plate . Than drag it to the first grandiat slider .For details see the picture.


Than select the 2nD rectangle with selection tool . The color of the first rectangle will appear in the color plate . Than drag it to the middle grandiat slider .For details see the picture.


Than select the 3rD rectangle with selection tool . The color of the first rectangle will appear in the color plate . Than drag it to the last grandiat slider .For details see the picture.


Now it is the time to bring the effect . Now select the text "Web Unbound" with selection tool . Than select the eye dropper tool from the toolbox . Than click with the eyedrop tool on 3rd rectangle .For details see below .


That's it . You will find your desired gold text-effect .


 You can use gradient tool to change the gradient position .

Thanks for reading this tutorial . We will publish more illustrator tutorials in webunbound.blogspor.com .So be connected with web unbound and learn illustrator easily.

If you have any suggestion than you can give it through comments . If you liked this tutorial than please comment .

Monday, May 13, 2013

10 Best responsive wordpress themes for free

Wordpress is the most popular and used CMS . Reason for it's popularity is it has user friendly management system . We can easily change themes, can easily add plugins and allover we can easily update our website . Wordpress has been created specially for bloggers . But nowadays it is using in every sphere . Nowadays web is getting responsive . Because in the earlier most of the people used desktop for browsing the web but nowadays world  has changed a lot . Now they are using smartphones, laptops, notebooks, iPads etc to browse the web . The screen size varies according to devices . So your website must response according to screen sizes for best user experience . For that your website must be responsive in design . Today I will give you some smashing Wordpress themes . With whom you can give your website a stunning look and can give visitors a good experience .


 So choose one , look at the preview and implant it in you wordpress site and enter the world of responsive .


1) Constellation


Preview  |  Download

2)Flexible


Preview  |  Download

3) Designfolio


Preview  |  Download

4) Simple Grid


Preview  |  Download

5) Unique


Preview  |  Download

6)Eclipse


Preview  |  Download

7)iFeature 4


Preview  |  Download

8) Responsive


Preview  |  Download

9) Bonpress


Preview  |  Download

10) Orion


Preview  |  Download

All the themes have been given are responsive . All the themes will adjust to users screen size . So use these responsive themes and give your users a better experience .

If you want more themes then keep visiting webunbound.blogspot.com and enjoy a unbound web . If you like this article then please comment . Because your comments will encourage me in writing more articles.